
Abstract Street Photography Course

Welcome to the Course by:
Alexandre Rouleau
Professional Travel, Street Photographer and Videographer
Professor of the Street Photography Campus.

At its heart, abstract street photography is about moving away from literal description and toward emotional interpretation. The street is still the raw material, but the goal is no longer simply to show what was there. Instead, you start asking different questions. What did the scene feel like? What did the movement suggest? What did the light do to the mood of the place? What happens when sharpness is no longer the main priority, and time itself becomes part of the composition?
This is what makes the subject so rich. Abstract street photography sits in a fascinating space between observation and invention. It still depends on the real world. You are not making images in a studio or building them from nothing. You are still working with actual people, actual weather, actual streets, actual light. But instead of treating those things as fixed facts to be described as clearly as possible, you begin to use them more freely. Motion becomes expressive. Blur becomes structural. Light trails become drawing marks across the frame. Ghosting becomes a way of showing time, memory, or emotional uncertainty.
That shift is important. Once you understand it, a great deal opens up.


In this course, we’ll look closely at five major approaches that sit at the core of this kind of work. The first is long exposure and slow shutter photography, where time is stretched and the city begins to smear into luminous motion.
The second is intentional camera movement, often called ICM, where the camera itself becomes part of the gesture and the image takes on a painterly quality.
The third is panning, where you move with the subject so that motion blur and relative sharpness work together in a more controlled way.
The fourth is multiple exposure and ghosting, where layered time creates images that feel almost dreamlike or psychologically charged.
And the fifth is the combination of shallow depth of field with movement, where focus, blur, and subject separation create images that feel fragile, cinematic, and unstable in the best sense.
Each of these techniques has its own history, its own visual language, and its own technical demands. We’ll take them seriously, because none of them is as random as they may seem to a beginner. There is craft here. There is physics here. There is timing, experimentation, and decision-making here. Even the most atmospheric image, the one that feels like pure instinct, is often resting on a very solid technical foundation.
That is why this course does not separate aesthetics from mechanics. We will move through both. We’ll talk about shutter speeds, lenses, sensor behavior, stabilization, subject movement, and the optical logic behind blur. But we’ll also talk about mood, ambiguity, tension, memory, and the psychological pull of images that resist easy reading. That balance matters, because abstract street photography only becomes truly interesting when technical control and emotional openness meet each other.
We’ll also spend time on history, because this genre did not appear out of nowhere. There is a lineage behind it. The urge to photograph movement, instability, fragmented perception, and fleeting urban experience has deep roots. Different photographers, across different decades, have approached the street not just as a place to document, but as a place to interpret. Some have used blur to express speed, loneliness, anxiety, or modernity itself. Others have used light and motion to strip the city of literal detail and reveal something more atmospheric, more suggestive, and at times more truthful than a sharp photograph could ever be.
And because this is meant to be useful rather than purely theoretical, we’ll keep returning to practice. You’ll find drills, structured exercises, field setups, case studies, and workflows designed for current cameras and current shooting realities. The gear side matters too, especially in 2026, because modern cameras offer extraordinary tools for this kind of work, but they also introduce their own complications. Stabilization, electronic shutters, high-ISO performance, computational previews, and AI-assisted features all shape how we now approach motion and abstraction. Some of these tools are genuinely helpful. Others can make the work feel too clean, too predictable, too automated if used without thought. We’ll deal with those tensions directly.
Just as importantly, we’ll touch on the ethical side of this work. Abstract street photography may be less literal than documentary street work, but it still involves public space, real people, and real environments. Blur does not automatically erase ethical responsibility. In some ways, abstraction can soften identity. In other cases, it can intensify the emotional charge of an image without giving the subject any real voice. That deserves serious attention, and we’ll give it that attention without turning the subject into a legal manual or a moral lecture.
What I want, above all, is for this to feel like a serious but readable deep dive. Clear, and immersive.
By the end, the aim is not simply that you know what abstract street photography is. The aim is that you begin to understand how it works as a visual language. You should come away knowing when blur adds meaning and when it merely looks careless. You should know how to use long exposure with intent rather than luck. You should understand the difference between expressive movement and empty randomness. And most importantly, you should begin to feel how light, time, motion, and uncertainty can be shaped into photographs that say something deeper than a literal record ever could.
Section 1: Historical Context – From Early Experiments in Motion to the Abstract Street Renaissance
To understand abstract street photography, we have to begin much earlier than the genre itself. Like most things in photography, it does not suddenly appear fully formed. It evolves, slowly, often unintentionally at first, as photographers begin to push against the limits of what the camera is supposed to do.
In the late 19th century, when photography was still in its technical infancy, people like Eadweard Muybridge and Étienne-Jules Marey began experimenting with motion in ways that were, at the time, revolutionary. Their work in chronophotography was not intended to be artistic in the modern sense. It was scientific, analytical, clinical. They wanted to understand how bodies moved through time.
And yet, if you look at those early images now, they feel surprisingly abstract. A running person broken into multiple exposures becomes a sequence of overlapping limbs. A bird in flight becomes a layered rhythm of wings. Time is no longer invisible. It leaves traces. It stretches, repeats, overlaps. What begins as documentation starts to drift into something else, something closer to interpretation.
This is an important change, even if it was not fully recognized at the time. The camera, for the first time, is not just recording a single moment. It is revealing motion itself as a visual phenomenon.
By the early 20th century, this idea begins to move more explicitly into the realm of art. Across Europe, particularly in avant-garde circles, photographers start to question the basic assumption that photography should reproduce reality as clearly as possible. Artists associated with movements like Dada and Constructivism begin to experiment with light, form, and perception.
Photographers such as László Moholy-Nagy and Man Ray are central here. Moholy-Nagy’s photograms, created without a camera by placing objects directly onto light-sensitive paper, transform everyday forms into abstract compositions of light and shadow. Man Ray’s rayographs and solarized images push even further, distorting tonal relationships and introducing a dreamlike and surreal quality.
While much of this work is not strictly “street photography,” it establishes something crucial. It proves that photography does not have to describe the world literally. It can interpret it. It can distort it. It can turn it into something emotional, ambiguous, or even disorienting.
That philosophical foundation matters, because abstract street photography depends on exactly that freedom.
The next major change comes after the Second World War, particularly in the 1950s. This is where we begin to see something much closer to what we now recognize as abstract street photography. The setting is no longer the studio or the experimental darkroom. It is the street itself.
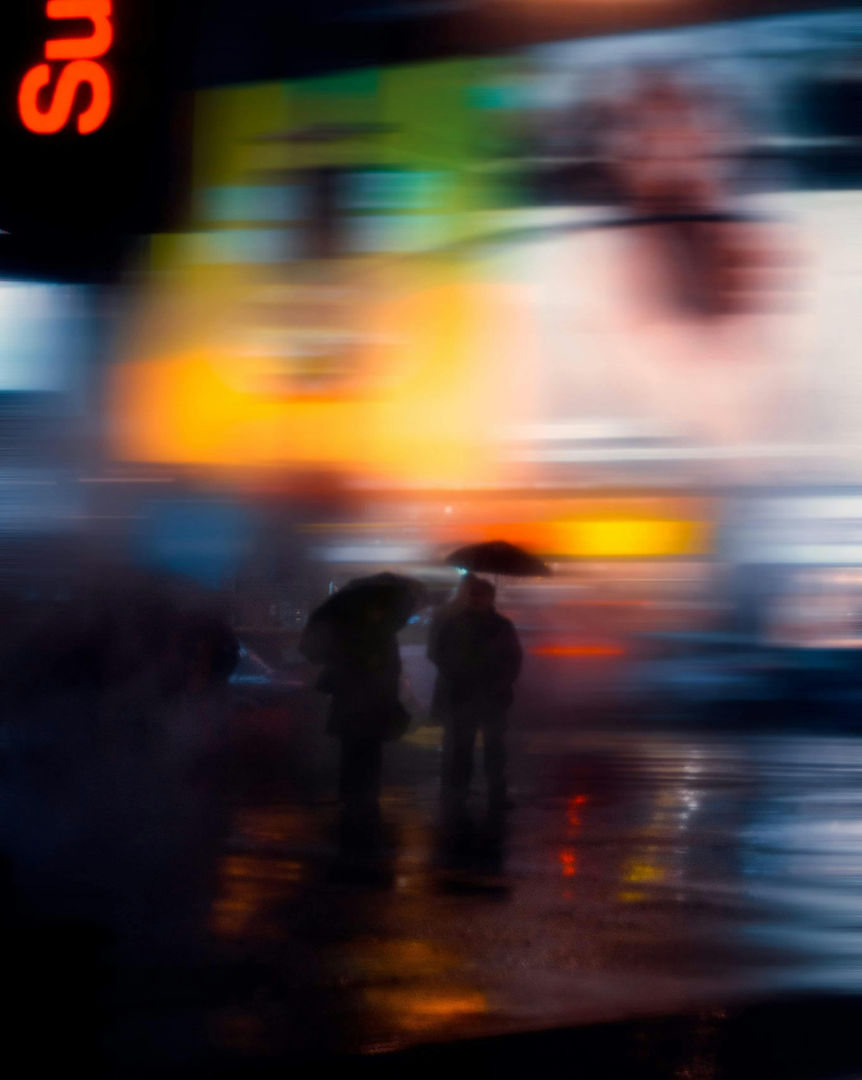
One of the most important people in this transition is Saul Leiter. Working in New York, often with color film at a time when black and white dominated serious photography, Leiter developed a way of seeing that was both subtle and radical. He used reflections, fogged glass, shallow focus, and slow shutter speeds to transform ordinary street scenes into something soft, layered, and painterly.
In many of his images, people are partially obscured, blurred, or reduced to shapes and colors. A red umbrella might dominate the frame, while people dissolve into the background.
What makes Leiter’s work so important is not just the technique, but the attitude behind it. He was not trying to capture decisive moments in the traditional sense. He was interested in atmosphere, in ambiguity, in the quiet poetry of the everyday. Blur, in his hands, was not a mistake. It was a deliberate choice.
Around the same time, William Klein was working in a very different but equally influential direction. His images of New York in the mid-1950s are raw, aggressive, and often intentionally imperfect. He embraced motion blur, high contrast, and unconventional framing to convey the energy and tension of the city.
Klein’s use of movement is particularly important here. Instead of trying to eliminate blur, he used it to amplify the feeling of chaos. A moving person might streak across the frame. The camera itself might shift during exposure. The result is a photo that feels unstable, almost loud, in visual terms.
Between Leiter and Klein, you can already see two different paths within abstract street photography. One is quiet, reflective, and painterly. The other is intense, dynamic, and confrontational. Both rely on the same underlying idea, that motion and imperfection can be expressive.
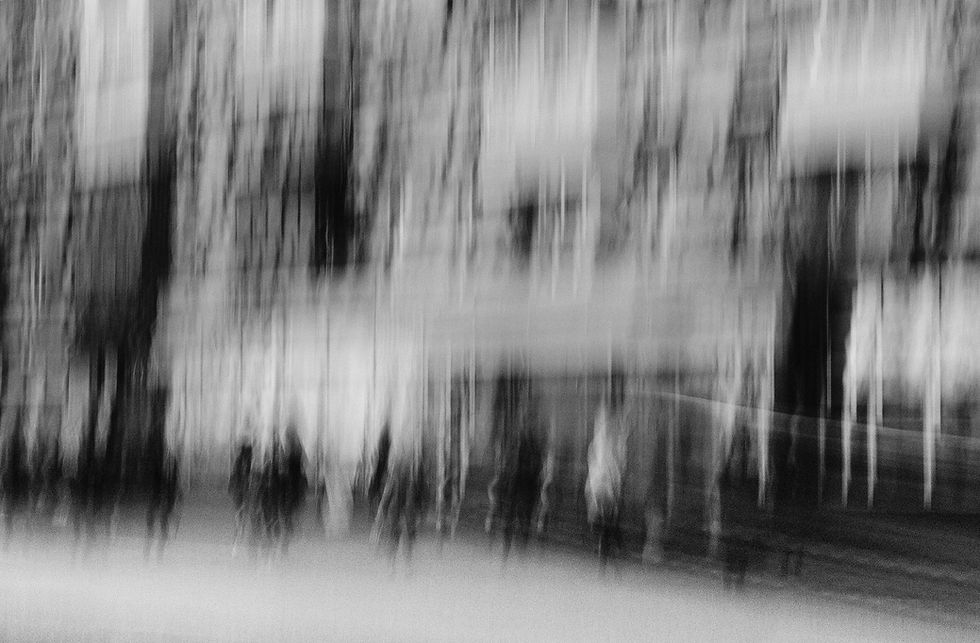
Moving into the 1970s and 1980s, this idea is taken further by photographers who begin to explore long exposure in a more deliberate and sustained way. One of the most significant figures here is Alexey Titarenko.
Titarenko’s work, particularly his “City of Shadows” series, uses long exposures, sometimes lasting several seconds, to transform crowds into ghost-like forms. People become blurred trails, semi-transparent figures moving through static architecture. The city itself remains solid, but human presence becomes something fleeting and spectral.
Technically, this requires careful control. Small apertures, slow film, and often neutral density filters to manage light. But what matters most is the conceptual result. These photos are about time, memory, and anonymity. The blur carries meaning.
Titarenko’s work shows very clearly that motion can be used not just for aesthetic effect, but for emotional and philosophical expression. We will take a much closer look at his work further down the line.
Parallel to this, another approach begins to develop, one that focuses less on subject movement and more on camera movement. This is what we now call intentional camera movement, or ICM.
Although its roots can be traced to photographers like Ernst Haas, who experimented with motion and color in the mid-20th century, ICM becomes more widely explored in urban contexts later on. By moving the camera during exposure, photographers create streaks, smears, and abstract patterns that can transform even the most ordinary scene into something very painterly.
More contemporary practitioners, such as Chris Friel, have developed this approach into a refined visual language. Using relatively slow shutter speeds, often between a quarter of a second and a couple of seconds, combined with deliberate camera movements, they turn streets, lights, and passing figures into flowing compositions of color and shape.
At this point, the boundary between photography and painting becomes increasingly blurred, in a conceptual sense. The camera is still capturing reality, but the result feels interpretive and not necessarily descriptive.
Multiple exposure is another thread that runs through this history. Early experiments by artists like Man Ray laid the groundwork, but the technique becomes more accessible and more widely used in later decades, especially with advances in camera design.
With the arrival of digital photography, these techniques become even more accessible. Cameras begin to include built-in multiple exposure modes. Software allows for precise control over layering. What was once experimental becomes part of the everyday toolkit.
At the same time, another approach gains prominence, combining shallow depth of field with motion. This can be traced back again to photographers like Saul Leiter, but it becomes more pronounced with modern lenses capable of very wide apertures.
By shooting at apertures like f/1.4 or f/2 and using slower shutter speeds, photographers create photos where only a small portion of the frame is in focus, while the rest dissolves into soft, moving shapes.
This approach has a distinctly cinematic quality. It feels intimate, but also unstable. The viewer is not given a clear, fixed point of reference. Instead, the image invites a lot of interpretation.
By the 2010s and into the 2020s, the rise of mirrorless cameras and smartphones accelerates all of these developments. Techniques that once required careful setup and specialized equipment become more accessible. Electronic shutters, improved high-ISO performance, in-body stabilization, and computational tools make it easier to experiment with motion and blur in real time.
In 2026, many cameras even include features that directly support this kind of work. As mentioned, multiple exposure modes, long-exposure noise reduction, and responsive electronic shutters make it easier to work with movement without technical limitations getting in the way.
What is important, however, is that despite all these technological changes, the core idea remains the same. Abstract street photography is about changing away from literal description and toward interpretation. It is about using time, motion, and light as active elements within the frame.
Today, abstract street photography stands as a kind of counterbalance to more traditional, sharply focused street work. It does not replace it. It exists alongside it. Where one emphasizes clarity and decisive moments, the other embraces ambiguity and duration.
Both approaches are valid. Both reveal different aspects of the world.
And understanding this history helps clarify something essential. When you choose to work with blur, motion, or abstraction, you are not abandoning photography’s foundations. You are engaging with a long tradition of photographers who have asked a simple but powerful question, namely: what happens when the camera is allowed to interpret rather than simply record?
That question is still open. And in many ways, it is what makes this field so alive.

Section 2: Technical Foundations – Optics of Blur, Motion Physics, and 2026 Sensor Realities
If abstract street photography feels expressive, fluid, even a little unpredictable, it is still grounded in something very concrete. Underneath every blurred person, every streak of light, every ghosted silhouette, there is a simple set of physical relationships at work. Light, time, and movement are doing exactly what the laws of optics say they should do. The difference is that here, instead of trying to control or eliminate those effects, we are deliberately leaning into them.
The most important place to begin is with shutter speed, because in this kind of photography, time is not just a setting, it is a visible element inside the image.
When you extend your shutter speed, you are no longer capturing a single instant. You are capturing a duration. Anything that moves during that duration leaves a trace. The length of that trace depends on two variables: how fast the subject is moving, and how long the shutter remains open.
A useful way to think about this is with a simple relationship. The length of a motion trail is roughly equal to the speed of the subject multiplied by the exposure time. In other words, distance equals velocity times time, but now that distance is being recorded visually.
So, if a person is walking at about 1.4 meters per second, and you use a shutter speed of two seconds, the camera will record nearly three meters of movement. That person doesn’t appear as a sharp figure anymore. They become a stretched, ghost-like presence moving through the frame.
If you apply the same idea to vehicles, which might move at ten or twenty meters per second, the effect becomes much more dramatic. With exposures of five or ten seconds, headlights and taillights turn into continuous streams of light.
Of course, there is an immediate practical problem. In daylight, long exposures quickly lead to overexposed images. Too much light enters the camera. This is where neutral density filters come in. These filters simply reduce the amount of light reaching the sensor, allowing you to use longer shutter speeds without blowing out the image.
Stronger filters, in the range of six to fifteen stops, are often necessary if you want to work with multi-second exposures during the day. Without them, you would be forced into very small apertures or extremely low ISO values, and even then you might not achieve the effect you’re after.
Interestingly, this brings us to diffraction, which is often treated as something to avoid in conventional photography. At very small apertures, like f/16 or f/22, light begins to spread slightly as it passes through the lens, softening the image. In sharp, detail-focused work, this is usually seen as a drawback.
But in abstract street photography, that softness can actually work in your favor. It complements the motion blur, creating a more cohesive, less clinical image. Instead of fighting diffraction, you can accept it as part of the visual language.
Now, long exposure captures the movement of subjects within the frame. But there is another layer you can introduce, and that is movement from the camera itself.
This is what we call intentional camera movement, or ICM. Instead of holding the camera steady, you deliberately move it during the exposure. That movement can be vertical, horizontal, circular, or even irregular, depending on what you want to achieve.
What happens, in simple terms, is that the blur you see in the image becomes a combination of two things: the motion of the subject and the motion of the camera. These two vectors interact. Sometimes they reinforce each other. Sometimes they partially cancel out. Often, they create something entirely unexpected.
For example, if you use a one-second exposure and move the camera upward in a steady motion, vertical elements in the scene, like buildings or streetlights, stretch into elongated streaks. The image begins to resemble a painting rather than a photograph.

If you rotate the camera in a circular motion during exposure, the result can feel almost like a vortex, with light and color spiraling around the frame. These effects are not governed by a single fixed formula. They are more empirical. You try, you observe, and over time you build a sense of what different movements produce.
Another technique that sits somewhere between control and unpredictability is panning. Here, instead of moving the camera independently, you match its movement to that of your subject.
If someone is walking across your frame, and you move the camera at roughly the same speed and direction, the subject remains relatively sharp while the background blurs. This creates a strong sense of motion without losing the subject entirely.
The difficulty is that perfect alignment is rare. Often, the camera movement is slightly off, or the subject changes speed. This introduces ghosting, small double edges or soft halos around the subject. Rather than seeing this as a flaw, many photographers embrace it. It adds a sense of instability, a reminder that what you are seeing is not a frozen moment, but a moving one.
Ghosting also appears naturally in longer exposures. If a subject moves through the frame and does not remain in one place long enough, it may partially disappear. Static elements, like buildings or parked cars, remain sharp. Moving elements fade, stretch, or vanish entirely.
Multiple exposure builds on this idea in a different way. Instead of capturing movement within a single exposure, you layer multiple exposures on top of each other. This can be done in-camera, using built-in modes on many modern systems, or through more traditional methods on film.
Each exposure adds light to the same frame. Areas where images overlap become denser. Areas where they differ create transparency and variation. The result is a composite image where time is layered rather than stretched.
Mathematically, you can think of this as an accumulation of light values. Each exposure contributes photons to the sensor, and the final image is the sum of those contributions. But visually, it feels less technical than that. It feels like memory, like multiple moments occupying the same space.
Modern cameras help manage some of the technical challenges here. Long-exposure noise reduction, for example, uses a second “dark frame” to subtract sensor noise, reducing unwanted artifacts like hot pixels. This is particularly useful when working with longer exposures or multiple layers.
Another approach worth exploring is the combination of shallow depth of field with motion. This may seem counterintuitive at first, because shallow depth of field is often associated with sharp, isolated subjects. But when you introduce motion into the equation, the effect changes.
Using a wide aperture, like f/1.4 or f/2, you create a very thin plane of focus. Only a small portion of the scene is sharp. Everything else is already soft. Now, if you combine that with a slower shutter speed, the out-of-focus areas begin to move and smear.
Light sources, in particular, become interesting. Points of light turn into soft, circular shapes, often called bokeh. When those shapes move, they stretch into trails. The image becomes layered, with sharpness, softness, and motion all interacting.
In this context, traditional depth-of-field calculations are almost inverted. Instead of trying to maximize what is in focus, you are deliberately minimizing it, using focus as a selective tool within a broader field of motion.
All of these techniques are influenced by the tools we use, and in 2026, those tools are more capable than ever.
High-resolution sensors, especially those around 60 megapixels, capture extremely fine detail. This means that even subtle motion can be recorded with a high degree of nuance. Smaller pixel sizes allow for smoother gradients in motion blur, making transitions feel more continuous rather than abrupt.
At the same time, these sensors can be less forgiving in bright conditions, which is why strong neutral density filters become even more important. Without them, achieving longer exposures in daylight becomes difficult.
In-body image stabilization, or IBIS, adds another layer of flexibility. Traditionally, stabilization is used to reduce unwanted camera shake. But in abstract work, it can be used more creatively. It allows you to work at slower shutter speeds while still maintaining a degree of control over your movements.
Electronic shutters also play a role. They eliminate the mechanical movement of the shutter itself, reducing vibration and allowing for quieter operation. This is particularly useful when working in public spaces, where subtlety matters.
When you bring all of these elements together, shutter speed, aperture, ISO, focal length, filter strength, and sensor characteristics, you begin to see how many variables are involved. It can feel complex at first, but over time patterns emerge.
You start to recognize that certain combinations produce certain types of images. A one-second exposure with a vertical camera movement creates a different feeling than a five-second exposure with no camera movement at all. A wide aperture combined with motion produces something entirely different from a small aperture and a long exposure.

Section 3: Practical Implementation – Step-by-Step Mastery for Each Technique, Gear Protocols, and Field Drills
In this section, the goal is to make each of the five major techniques feel repeatable and easy to do for you.
Long Exposure / Slow Shutter Speed
If there is one foundational technique in abstract street photography, it is slow shutter work. This is the clearest and most direct way to make time visible. The principle is simple enough: if the shutter stays open long enough, anything moving through the frame leaves a trail, while whatever remains still holds its shape. In practice, though, the difference between a muddy failure and a beautiful image often comes down to a series of small decisions made before you even press the shutter.
The first decision is where and when to shoot. Long exposure street photography works best when the scene already contains contrast, movement, and light variation. You want places where static structure and moving life can interact. An empty street at noon rarely gives you much to work with unless you are intentionally going for something minimal. What tends to work better is a busy crossing, a traffic-heavy intersection, a rain-soaked pavement reflecting neon, a station entrance where pedestrians pour through in waves, or a riverside walkway where moving people cut through a still background.
Time of day matters just as much. Dawn, dusk, blue hour, and night are usually the most forgiving because the light levels allow longer exposures without fighting the scene. Artificial light also becomes part of the composition. Headlights stretch, signs glow, reflections, and moving people leave softer, more atmospheric traces. Midday can still work, but then you are usually dealing with stronger filters, harsher contrast, and a more technical setup.
Once the location is chosen, you need to think about stability. If you are working with genuinely long exposures, anything above about two seconds, a tripod becomes the simplest and most reliable option. That does not mean you need a huge studio tripod. In the street, portability matters. A compact but solid carbon-fiber tripod is often enough.
There is also a middle ground, and this is where modern cameras have changed the game. If you are working in the range of a quarter-second to one or two seconds, especially with wider lenses, in-body image stabilization can be incredibly helpful. It will not replace a tripod for every situation, but it can let you make semi-handheld long exposures that feel more spontaneous and less conspicuous. Sometimes that slight instability is actually useful. It keeps the image from feeling too rigid.
The next issue is light control. In low light, you can often shoot long exposures with no filter at all. But as soon as the scene gets brighter, you will run into the same problem every long-exposure photographer faces, too much light enters the camera before the image has had time to develop the motion you want. This is where neutral density filters become essential.
A neutral density filter simply cuts light, allowing you to keep the shutter open longer. If you meter a scene at 1/60 second and add a six-stop ND filter, that exposure extends dramatically, into a range where blur and trails become visible. You do not need to memorize every conversion, but it helps to understand the logic. Each stop doubles the exposure time. So the more stops you add, the longer you can stretch time inside the frame.
In practical terms, six to ten stops is often a useful range for daylight and bright twilight street work. If you are shooting after sunset, you may not need anything at all. One of the advantages of working in urban environments is that artificial light often does the aesthetic work for you. The city becomes luminous once the shutter has enough time to see it.
Exposure itself is best handled in manual mode for this kind of work, because consistency matters. You do not want the camera rethinking the scene every time a bright bus enters the frame. A small aperture, somewhere around f/11 to f/22, is often helpful because it gives you more depth of field and also slightly softens the rendering through diffraction, which is not a problem here. In fact, that slight softness can be part of what makes the final image feel more atmospheric.
ISO should usually stay low, as low as the camera allows cleanly, because long exposures already invite noise. Keeping ISO at 50 or 100 helps preserve tonal smoothness and gives you more room to work with light sources in the frame.
Shutter speed is where the image really starts to take shape. If you want pedestrians to become soft but still somewhat recognizable, one or two seconds is often enough. If you want crowds to dissolve into true ghosting, or vehicles to become long continuous trails, you may move into the range of eight, fifteen, or even thirty seconds. The longer you go, the less individual movement matters and the more the image becomes about flow.
Focusing needs to be simple and deliberate. Long exposure is not the time for the camera to guess. Pick a static element in the scene, a railing, signpost, bench, curb, building edge, and focus manually. Use focus peaking or magnification if needed, then lock it in place. The moving elements will take care of themselves. What matters is that the structure of the frame holds.
Triggering the shot cleanly matters more than people sometimes think. The more carefully you compose, the more frustrating it is to ruin the frame with a small vibration at the start. A cable release, a phone app, or even a two-second timer is often enough. The point is to remove your hand from the camera at the moment of exposure.
There is also a more advanced approach worth mentioning: stacking shorter exposures instead of relying on a single very long one. In the street, this can be especially useful. Rather than making one thirty-second exposure, you might make a series of shorter ones from the same position and later blend them. This gives you more control over density, reduces sensor heat and noise, and allows you to build up ghosting gradually. It is a more editorial way of working, but in some scenes it gives better results than trying to force everything into one frame.
As for gear, the specific camera matters less than how you use it, but some systems do make this kind of work easier. Compact cameras with built-in ND options, mirrorless bodies with strong stabilization, and cameras with quiet electronic shutters all fit this style well. Wide lenses are often the best starting point because they let motion curve and sweep through the frame while keeping the architecture present.
To build real control, repetition is essential. One very effective drill is to return to the same location and make a series of exposures at a fixed shutter speed, reviewing how different subject speeds change the look of the trails. Another is to work progressively from one second to fifteen seconds in the same scene, then compare which duration actually conveys the feeling you were after. This is where you begin to stop guessing and start recognizing patterns.

Intentional Camera Movement (ICM)
If long exposure uses the movement of the world, intentional camera movement adds your own movement into the equation.
ICM works best when the scene already has strong visual energy. Lights, color contrast, repeating lines, reflective surfaces, moving crowds, all of these give the technique something to work with. You can make ICM images almost anywhere, but the strongest ones usually come from scenes that would already have some visual character even before you begin moving the camera.
Unlike traditional long exposure, this is usually a handheld technique. That matters, because the physical relationship between you and the camera becomes part of the image. A tripod would defeat the point.
Exposure settings should be simple enough that you can repeat them quickly. A shutter speed somewhere between a quarter-second and a few seconds is usually the sweet spot. One second is a particularly good place to begin because it gives you enough time to make a clear gesture without everything becoming completely chaotic. Aperture around f/8 to f/16 often works well, and ISO can stay modest unless you are in very low light.
Lens choice changes the character of the movement. Wider lenses exaggerate spatial relationships and often make the streaks feel broader and more immersive. A 28 mm or 35 mm equivalent is a very practical place to start. The wider field of view also makes your gestures feel more dramatic.
The actual movement of the camera is the heart of the technique. You compose loosely around something structural, a streetlight, a building edge, a road line, a row of illuminated windows, and then once the shutter opens, you move the camera in a controlled way. A vertical drag creates rising streaks that often feel architectural or energetic. A horizontal movement tends to suggest speed or urban flow. Circular motion can become almost dizzying, especially around lights. Diagonal movements add tension and instability.
The key is smoothness. A lot of beginners move too abruptly, which creates images that feel more accidental than expressive. What you want is a gesture that has intention. Not necessarily perfection, but coherence. Think less in terms of shaking the camera and more in terms of drawing with it.
One useful way to approach this is to “follow” the light. If there is a bright sign, a row of headlights, or a strong reflective strip in the scene, move the camera in dialogue with that element. Let it guide the gesture. Sometimes a slow start with a faster finish creates more interesting variation than a perfectly even movement. The image feels alive because the motion had rhythm.
ICM also benefits from immediate review. This is not a technique where you usually nail it once and move on. You make a frame, look at what the movement did, then adjust. Was the drag too fast? Too short? Too circular? Did the color remain rich, or did everything smear into gray? These small observations make the next frame better.
One of the best drills here is repetition by direction. Spend a session making only vertical drags, then another with only horizontal ones. Later, compare. You begin to see not just what works technically, but what kind of emotional tone each motion introduces. Another good exercise is speed variation, making the same type of movement slowly and then quickly to see how the image changes from painterly to agitated.
